Scan Image Vulnerability Before Push
Build a multi-platform image into an OCI layout, scan each platform, and push only if the scan passes.
Prerequisites
The Build Image (Buildx) step is disabled by default. Turn on Enable Buildx Image Build under Security Settings of the Server Docker Executor or Remote Docker Executor running this job. If no executors are defined, OneDev uses an auto-discovered executor with this option disabled; define an executor explicitly. See Enable Image Build in the Executor for setup instructions.
The built-in Trivy Container Image Scanner requires an active Enterprise subscription and a Docker-capable executor. OneDev itself can run natively. Check Administration → Subscription Management before running the job.
Enable package management on the destination project. Store a local OneDev access token with Package Writer permission as the job secret package-token, authorized for the branch running this job. The example uses project tutorial-image-scans; replace the registry hostname and project path with your own.
Both the registry address and OneDev's configured Server URL must be reachable from job containers. A registry reachable at host.docker.internal can still fail authentication if its token endpoint advertises localhost, which refers to the container itself.
Configure the Scan Gate
Use these steps in order:
- Build Image (Buildx): choose OCI layout directory as output, set its path to
image, and set Platforms under More Settings tolinux/amd64,linux/arm64. - Trivy Container Image Scanner: scan
image, enable vulnerability checks, set Fail Threshold to High, and leave Platforms empty to scan every platform in the layout. Enable Publish JSON Report As Artifact to retain raw results. - Push Image: use the same
imagedirectory and configure the registry login with username@job_token@and password secretpackage-token. Keep its execution condition Successful.
The following runnable example creates a tiny scratch fixture to verify the successful path. Replace its preparation step with checkout and your application's Dockerfile for real builds. The registry placeholder assumes HTTPS; the isolated HTTP test used --insecure in the push step's additional options.
version: 53
jobs:
- name: Publish Image
  steps:
  - !CommandStep
    name: Prepare image
    runInContainer: true
    image: alpine:3.20
    interpreter: !PosixInterpreter
      shell: sh
      commands: |
        printf 'FROM scratch\nCOPY payload.txt /payload.txt\n' > Dockerfile
        echo tutorial-image-scan > payload.txt
    runAs: '0:0'
    condition: SUCCESSFUL
  - !BuildImageStep
    name: Build multi-platform OCI image
    output: !OCIOutput
      destPath: image
    platforms: linux/amd64,linux/arm64
    condition: SUCCESSFUL
  - !ImageScannerStep
    name: Scan image
    scanPath: image
    checkVulnerabilities: true
    reportName: Vulnerabilities
    failThreshold: HIGH
    publishJSONReportAsArtifact: true
    condition: SUCCESSFUL
  - !PushImageStep
    name: Push after successful scan
    srcPath: image
    destImage: onedev.example.com/tutorial-image-scans/ci:clean
    registryLogins:
    - registryUrl: onedev.example.com
      userName: '@job_token@'
      passwordSecret: package-token
    condition: SUCCESSFUL
  retryCondition: never
  timeout: 900
Optionally add the Trivy cache step before scanning to reuse its downloaded databases.
Verify Both Outcomes
For a failing scan, inspect the vulnerability report and confirm the push step was skipped and the destination tag was not created. In the local check, an intentionally obsolete alpine:3.12 fixture produced a Critical zlib finding, failed the High threshold, and was not published. Do not use that obsolete base image for an application. Findings vary with database updates.
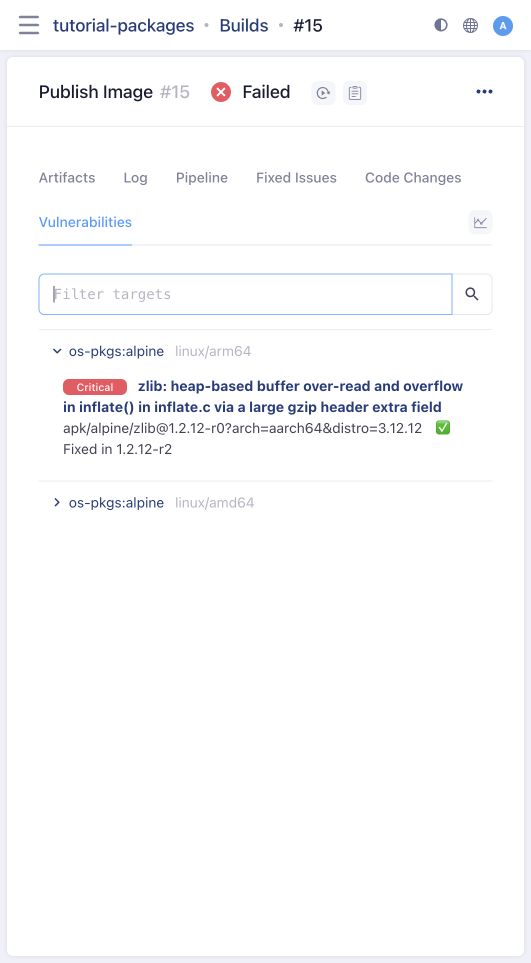
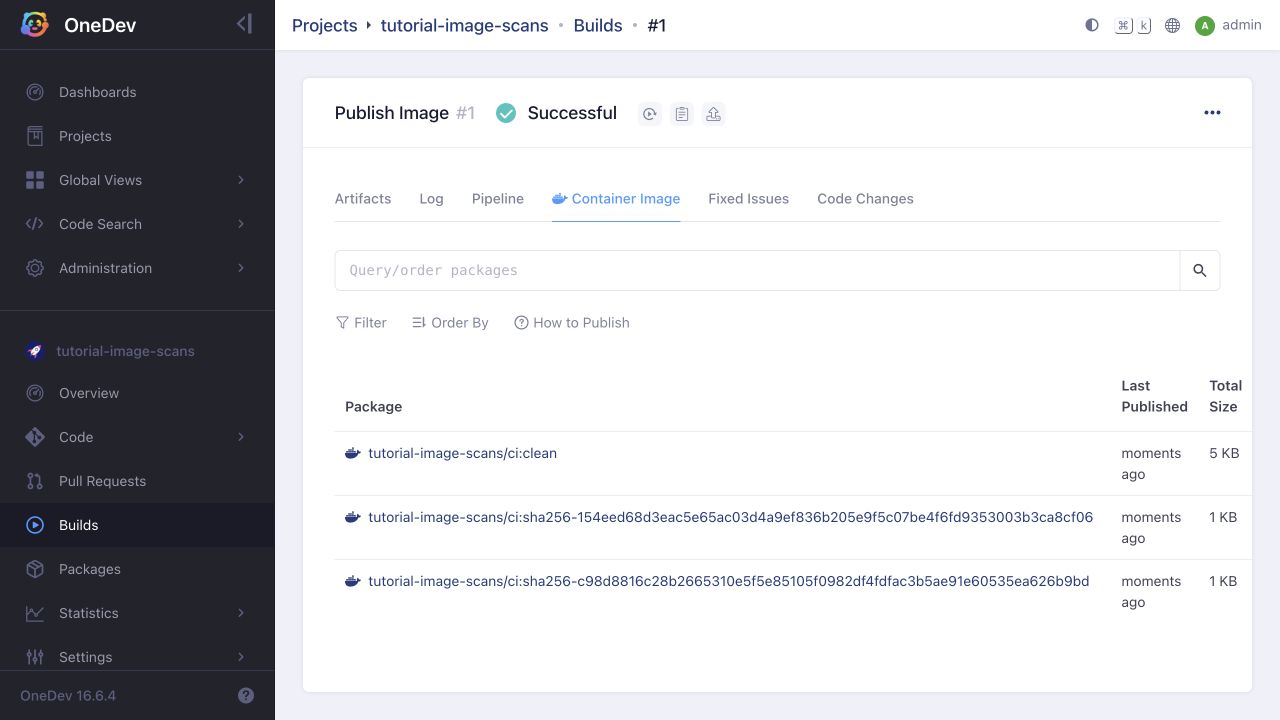
Fix the affected image or dependencies, then rerun. The clean synthetic image above passed scans for both linux/amd64 and linux/arm64 and appeared under the successful build's Container Image tab:
A successful scan means no findings crossed the configured threshold in the scanned content; it is not a guarantee that the image has no vulnerabilities. Only add an ignore file after assessing and recording why a finding does not apply. Suppression hides a finding; it does not remove vulnerable software.