Working with MCP
OneDev ships a MCP server since version 13.0 with tools and prompts that allow you to interact with OneDev via AI assistants in an intelligent and natural way.
Set up MCP Server
This tutorial explains how to use this MCP server in Cursor IDE. We assume that OneDev server 13+ is running at http://localhost:6610. If you do not have a OneDev server, you may start one by running:
docker run -it --rm -v /var/run/docker.sock:/var/run/docker.sock -v $(pwd)/onedev:/opt/onedev -p 6610:6610 -p 6611:6611 1dev/server
Download MCP Server
We first need to download tod for your platform and place the binary in your PATH. Open a terminal and run the command tod to make sure it prints help. Depending on your OS, you may need to make tod executable and/or trust the binary to allow it to run.
Create Tod Config
Create file $HOME/.todconfig with the following content:
server-url=http://localhost:6610
access-token=your-personal-access-token
Check this tutorial if you do not know how to generate an access token in OneDev.
After creating the config file, run the command tod mcp to test the config. The command will wait indefinitely if there are no errors. Stop the command to proceed to the next step.
Add MCP Server in Cursor
For demonstration purposes, we create an example React application with default settings:
npx create-next-app@latest
Assume the application is created in folder /path/to/my-app. Now create project my-app in OneDev, and push code to OneDev by running the following command:
git remote add origin http://localhost:6610/my-app
git push -u my-app
Make sure the access token you configured previously has Write Code permission in this project.
Open folder /path/to/my-app with Cursor, open Cursor settings, and add an MCP server with the following configuration:
{
  "mcpServers": {
    "OneDev": {
      "command": "tod",
      "args": [
        "mcp",
        "--log-file",
        "/tmp/tod.log"
      ]
    }
  }
}
After adding the configuration, the OneDev MCP server should be available with tools and prompts listed below:

Usage Examples
Now we will demonstrate OneDev MCP server capabilities with some examples. The Cursor chat window should run in agent mode, and we will use auto model for these examples. When running these examples, Cursor will request your consent to call OneDev tools, and you will need to allow it.
Create Build Spec
We will first create a simple build spec for the project. Input '/' in the chat window and select the edit-build-spec prompt template as shown below:
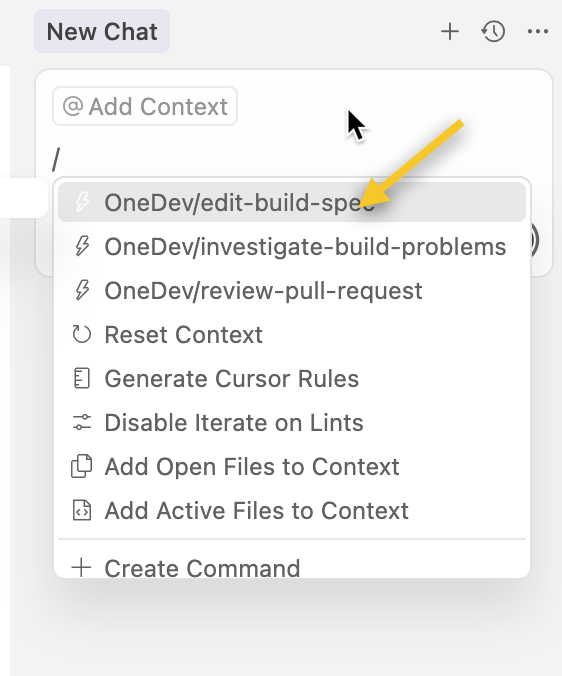
Then type your instruction, for instance "create a simple build spec for this project", submit the generated prompt, and Cursor will work to generate a build spec.
After generating the build spec, add it to the git index and run it to see if it actually works. To do this, switch to the terminal tab and run the command tod run-local <generated job name>. The job will be submitted to the OneDev server for running, and the build log will be streamed back to the console. You may cancel the build at any time by pressing Ctrl/Cmd+C. In my case, the build fails with the following log:
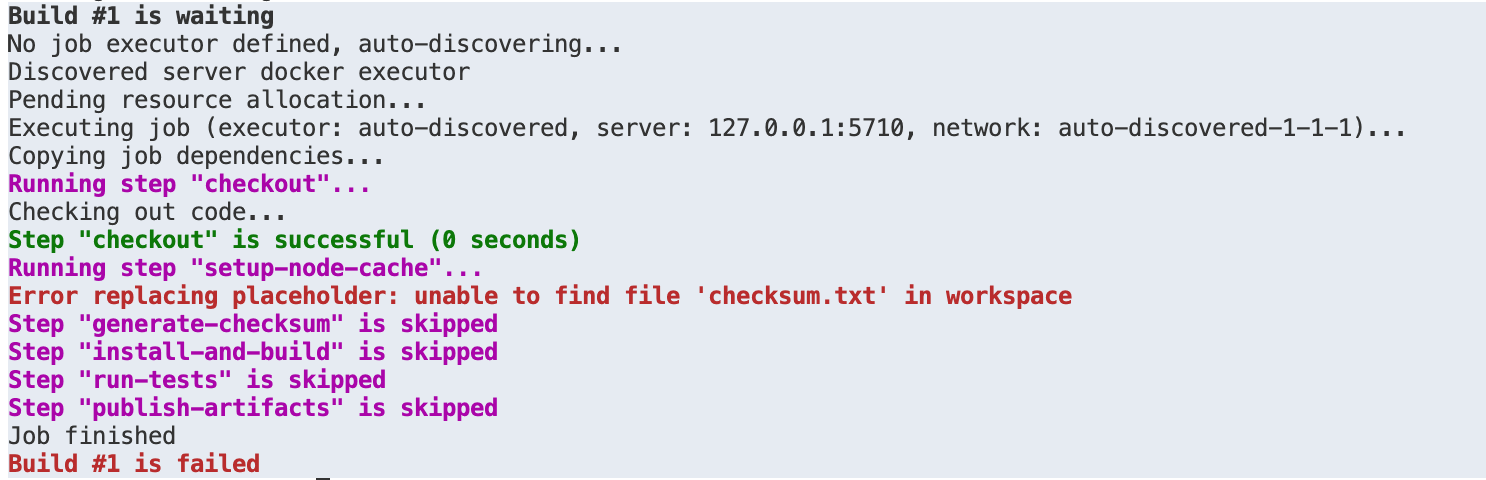
We can now tell Cursor to investigate the build failure with another prompt template investigate-build-problems, input build number #1, and leave the instruction empty. Cursor will check the build log, necessary source code, and even changes since the previous successful build to figure out the issue. For this case, it turns out that the generate checksum step is placed after the set up cache step, which is wrong. Follow Cursor's suggestion to apply the change, and run the job again to see it now succeeds. The build log may print a warning message complaining about not being authorized to upload cache. This is fine as for security reasons, only jobs run from the default branch are allowed to upload cache, unless a cache upload secret is configured in the cache step.
We can continue to tell Cursor to run the job whenever the branch is updated with the aforementioned prompt template if the job trigger is not added previously. Commit the change and push to the OneDev server, and the job should be running automatically and cache should be uploaded to make subsequent builds faster.
Interact with Issues
Assume that you are using the default issue workflow in OneDev. Chat with Cursor to create a feature request with high priority like below:
Create a feature request of high priority to add Docker support, and assign it to me. Description: Add Dockerfile so that we can build docker image for this application for deployment
Cursor will create an issue in OneDev with the following custom fields:
- Type: New Feature
- Priority: Major
- Assignees: <your login name>
Since OneDev by default has a Sub Issues link, we can continue to talk to Cursor to add two sub tasks:
Add two sub tasks to issue #1 and assign all of them to me:
1. Create a Dockerfile for the application
2. Improve build spec to be able to build docker image with this Dockerfile
We can also perform complex queries with natural language, for instance high priority open issues assigned to me or sub tasks of #4 in progress. Cursor will compose an appropriate issue query and send it to the OneDev server for execution.
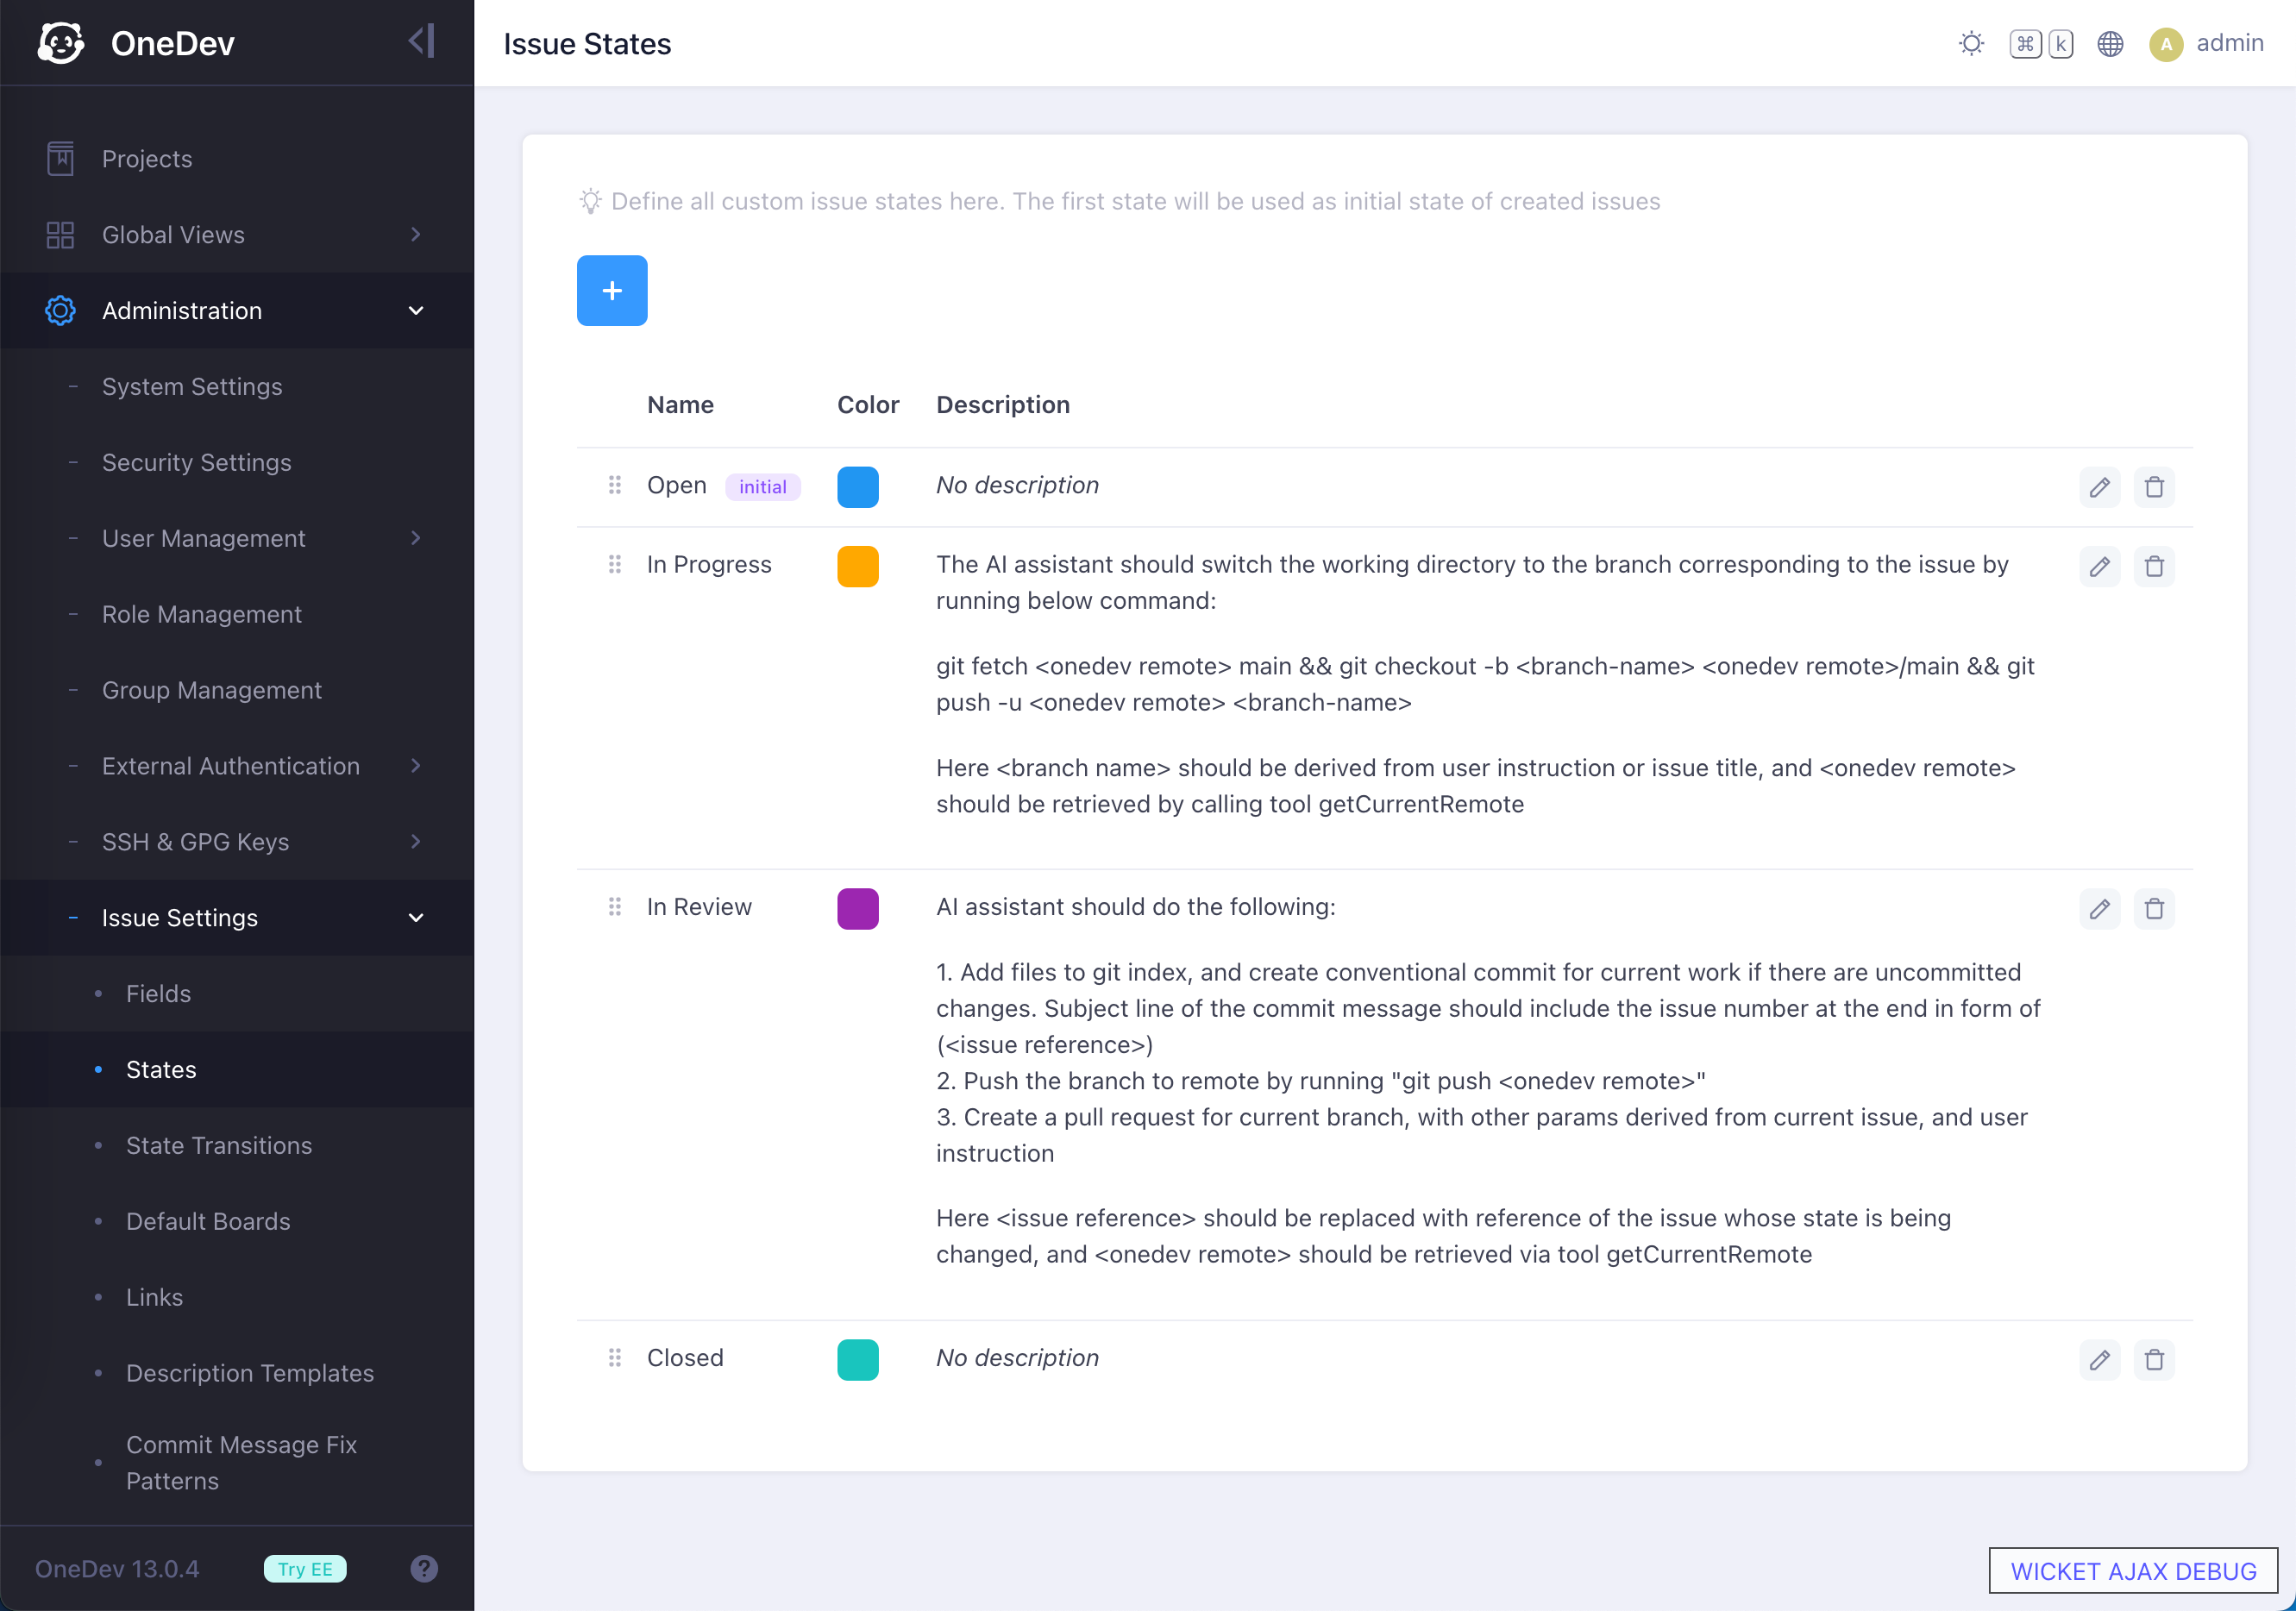
Now let's work on the first sub task (assume its issue number is #2) by selecting the change-issue-state prompt template, specifying issue reference as #2, and instruction as "work on the issue on branch add-dockerfile". Cursor will first set the issue state as "in progress", then follow instructions in the description of the "in progress" state to switch the working directory to the specified branch with remote tracking branch set up as well:
After finishing our work on the branch, we call the change-issue-state prompt template again to transition issue #2, with instruction "request review from tim". Upon this, Cursor will set the issue state as "in review". It also follows the description of the "in review" state to commit code, push to OneDev, create a pull request for the change, and add robin as a reviewer.
Interact with Pull Requests
Continuing with the above example, we can use the review-pull-request prompt template to have Cursor review the pull request. After the review, it will request your consent to either approve the change, request additional modifications, or simply post a comment on the pull request if the current user is not a reviewer.
If everything looks fine, you may tell Cursor to merge the pull request by typing "merge pr #1" (assume #1 is the reference of the pull request we mentioned). After the pull request is merged, issues associated with it will be closed with the default issue workflow.