GitOps with Kubernetes
GitOps is a DevOps approach to maintain Kubernetes-based infrastructure as code in git, and operate it with git tools such as push, revert, pull request.
This tutorial explains how to set up OneDev to do GitOps in Kubernetes.
Set Up Kubernetes Cluster
Firstable we need a Kubernetes cluster. You may use an existing one, or just set up a new one. For this tutorial, we chose to use GKE (Google Kubernetes Engine).
Just follow the quick start to create a cluster. To save your money, the default pool with only one node is sufficient for our testing. For node image type, use the default Container-Optimized OS; for machine type, please select one with at least 8G mem . After creating the cluster, go ahead to configure kubectl to connect to the cluster following this guide.
To verify that things are working, run below command in your terminal to make sure it is successful:
$ kubectl cluster-info
Install OneDev into Kubernetes Cluster
Now that we have a working cluster. Let’s deploy OneDev into the cluster to manage code of our demo project
- Make sure helm3 is installed. Run below command to deploy OneDev chart into your cluster:
$ helm install onedev onedev --repo https://code.onedev.io/onedev/~helm --namespace onedev --create-namespace
- After deployment, run below command to show external ip of OneDev service (may need to wait a while for external ip to be assigned):
$ kubectl get service onedev -n onedev
- Open url
http://<OneDev external ip>with your browser to set up OneDev (use default settings except for creating administrator account). Wait a while and try again if OneDev is not ready
Add a Demo Project into OneDev
OneDev should be up and running. Let’s set up a demo project now:
- From OneDev projects page, add a project named gitops-demo
- From the terminal, create a react project, and push to OneDev by running below commands (you need to have node.js environment. Refer to react documentation if you are not familiar with it):
$ npx create-react-app gitops-demo $ cd gitops-demo$ git remote add origin http://<OneDev external ip>/gitops-demo$ git push --set-upstream origin master
_(use OneDev admin account created previously for authentication)_
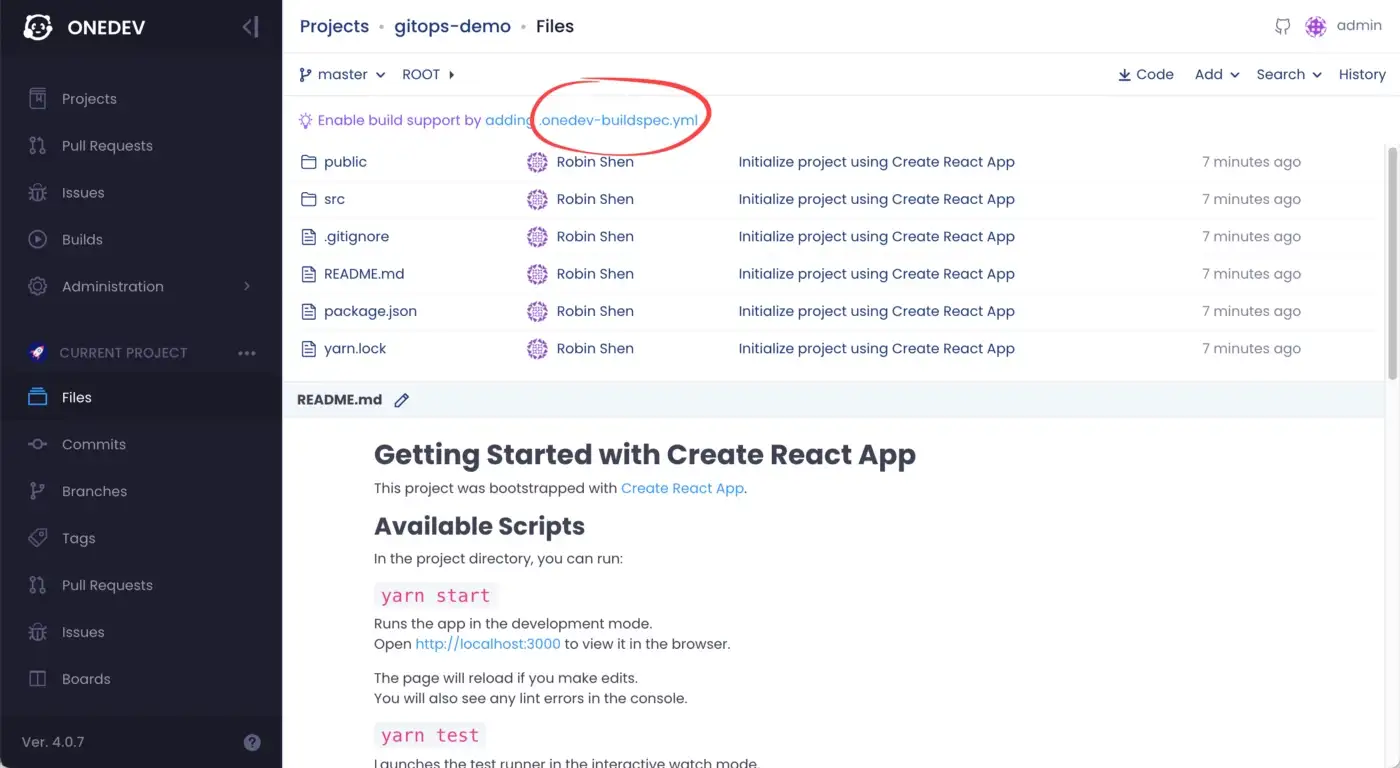
-
Refresh files page of the demo project in OneDev, and click the add build spec link as below:
-
From the build spec edit page, switch to Edit Source tab without adding any job and replace the source with below content (do not worry about the syntax. In most cases you only need to work with the GUI editor):
version: 6
jobs:
- name: CI
  steps:
  - !CheckoutStep
    name: checkout
    cloneCredential: !DefaultCredential {}
    condition: ALL_PREVIOUS_STEPS_WERE_SUCCESSFUL
  - !CommandStep
    name: detect build version
    image: node:15.4-alpine
    commands:
    - set -e
    - ''
    - apk add --update jq
    - echo `jq -r '.version' package.json` > buildVersion
    condition: ALL_PREVIOUS_STEPS_WERE_SUCCESSFUL
  - !SetBuildVersionStep
    name: 'set build version'
    buildVersion: '@file:buildVersion@'
    condition: ALL_PREVIOUS_STEPS_WERE_SUCCESSFUL
  - !CommandStep
    name: build
    image: node:15.4-alpine
    commands:
    - set -e
    - ''
    - yarn install
    - ''
    - export CI=true
    - yarn test
    condition: ALL_PREVIOUS_STEPS_WERE_SUCCESSFUL
  triggers:
  - !BranchUpdateTrigger {}
  retryCondition: never
  maxRetries: 3
  retryDelay: 30
  cpuRequirement: 250m
  memoryRequirement: 128m
  caches:
  - key: npm-cache
    path: /root/.npm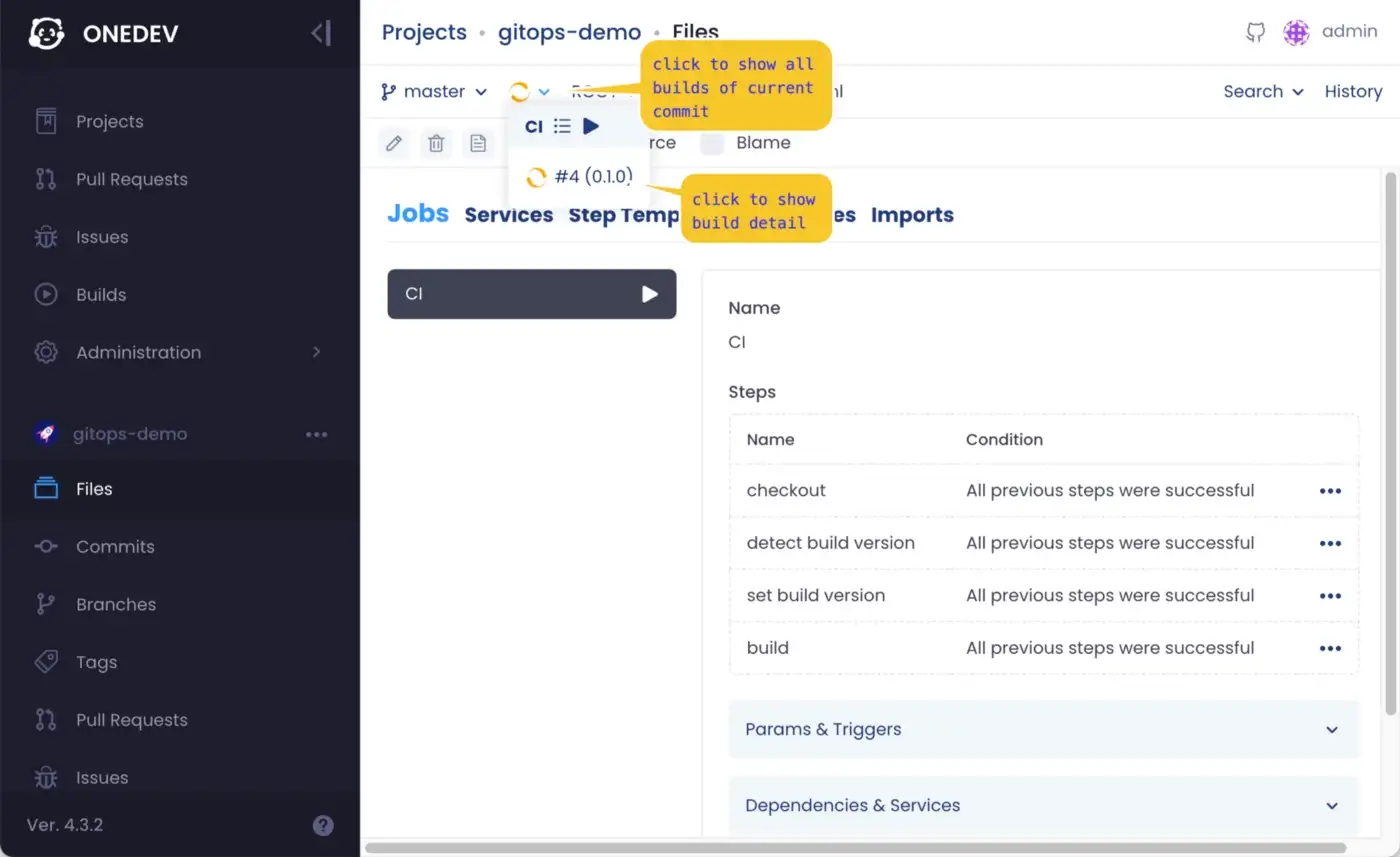
timeout: 3600 -
Save and commit the change. Our CI build should be running now as demonstrated below:
Set Up GitOps for the Demo Project
We now have a demo project with CI ability. Let’s improve it to be able to deploy to Kubernetes:
-
To deploy to Kubernetes, we need to build and publish docker image of the demo project. We will use the official docker hub registry here. Please visit https://hub.docker.com/, login with your account, and create a public repository, say gitops-demo (OneDev also works with private repository, we create public repository here for simplicity purpose)
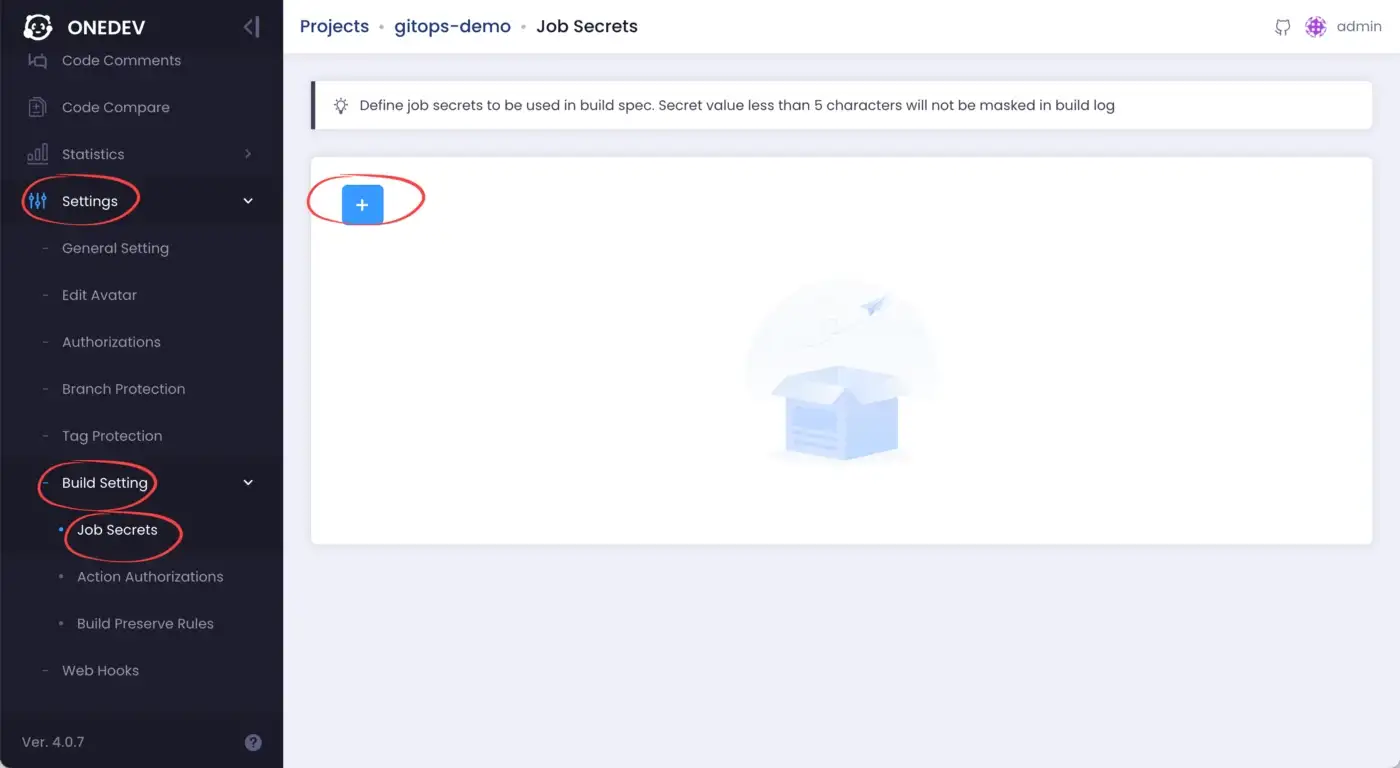
-
To be able to publish docker image to your repository, OneDev needs to know credential of your docker hub account. To do it, add a job secret in the demo project, give it a name, for instance, dockerhub-password, and input docker hub password as value of the secret
-
To deploy docker image of the demo project into Kubernetes, we need to give extra permissions to OneDev builds. To do it, create a file say gitops-demo-role.yaml in your terminal with below content:
kind: ClusterRole
apiVersion: rbac.authorization.k8s.io/v1
metadata:
  name: gitops-demo
rules:
- apiGroups: [""]
  resources: ["services"]
  verbs: ["get", "create"]
- apiGroups: ["apps"]
  resources: ["deployments"]
  verbs: ["get", "patch", "create"]
Then run below command to add the role into Kubernetes:
$ kubectl apply -f gitops-demo-role.yaml
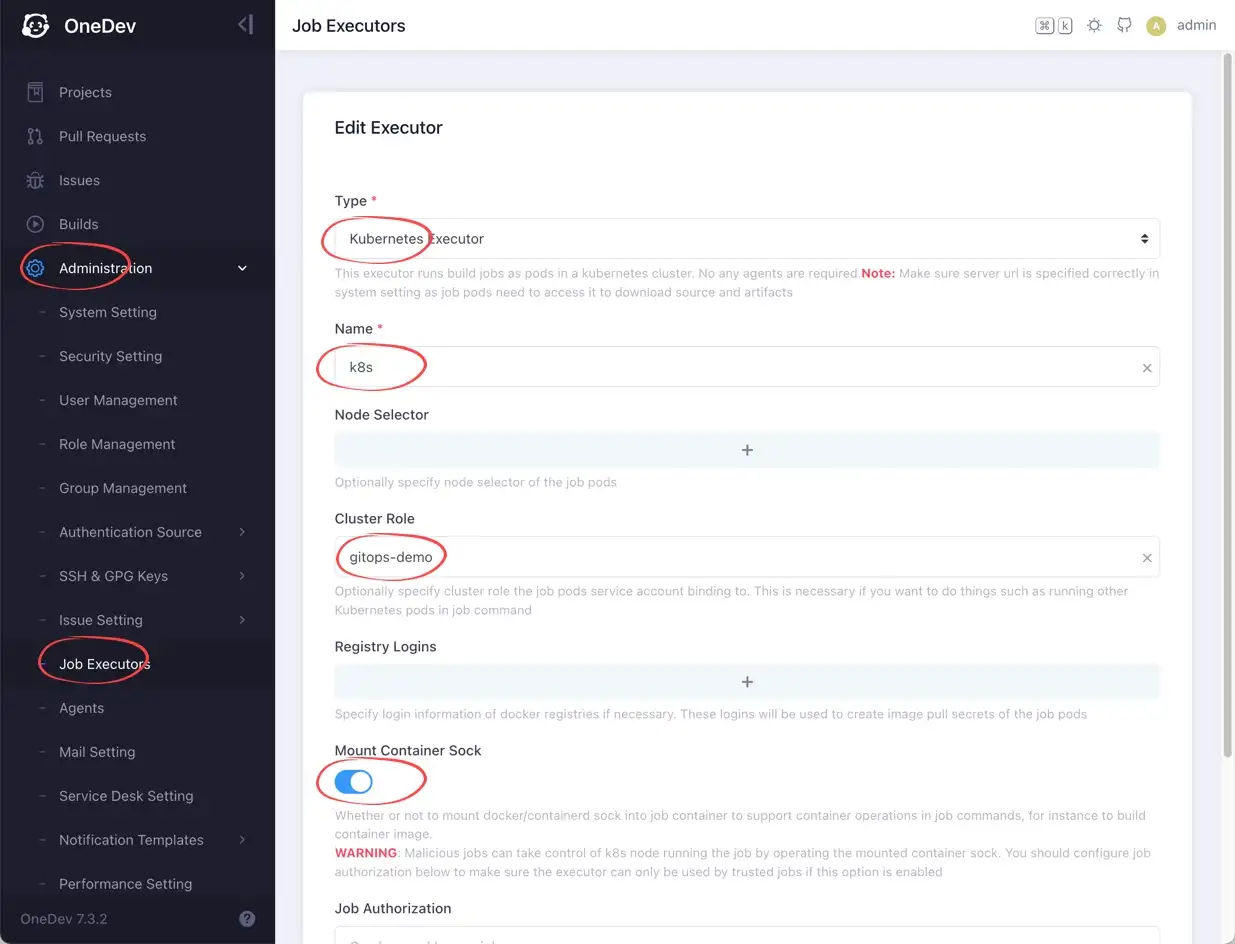
After doing above, switch to job executors page in OneDev, add a Kubernetes executor, give it a name, and specify property Cluster Role as gitops-demo, leave all other fields untouched and save the executor
-
Since we need to build docker image of our demo project, let’s add a Dockerfile in root of the project with below content:
FROM nginx:1.19.5
COPY build /usr/share/nginx/html
EXPOSE 80 -
We deploy the demo project via Kubernetes resources, so continue to add a file k8s.yaml in root of the project with below content, and replace all occurrences of
<your-dockerhub-account>with name of your docker hub account:apiVersion: apps/v1
kind: Deployment
metadata:
name: gitops-demo
labels:
tier: gitops-demo
spec:
selector:
matchLabels:
tier: gitops-demo
strategy:
type: Recreate
template:
metadata:
name: gitops-demo
labels:
tier: gitops-demo
spec:
containers:
- name: gitops-demo
image: <your-dockerhub-account>/gitops-demo:imageTag
ports:
- containerPort: 80
---
apiVersion: v1
kind: Service
metadata:
name: gitops-demo
labels:
tier: gitops-demo
spec:
type: LoadBalancer
ports:
- name: http
port: 80
targetPort: 80
protocol: TCP
selector:
tier: gitops-demo -
Edit build spec in OneDev (click file .onedev-buildspec.yaml from root of the project and then edit it), set image of build step as docker:19.03.5, and use below commands, with all occurrences of
<your-dockerhub-account>replaced by name of your docker hub account.set -e
apk add --update npm curl
npm install -g yarn
yarn install
export CI=true
yarn test
yarn build
docker build -t <your-dockerhub-account>/gitops-demo:@commit_hash@ .
docker login -u <your-dockerhub-account> -p @secrets:dockerhub-password@
docker push <your-dockerhub-account>/gitops-demo:@commit_hash@
curl -o /usr/local/bin/kubectl -LO "https://storage.googleapis.com/kubernetes-release/release/$(curl -s https://storage.googleapis.com/kubernetes-release/release/stable.txt)/bin/linux/amd64/kubectl"
chmod +x /usr/local/bin/kubectl
sed -i "s/imageTag/@commit_hash@/g" k8s.yaml
kubectl apply -f k8s.yaml -n default -
Save and commit the change. OneDev will start to build and deploy the demo project. After build is successful, run below command to show external ip address of published demo service:
$ kubectl get service gitops-demo
Open url http://<gitops-demo-external-ip-address> with your browser to show the deployed demo app.
- Congrats! You’ve successfully set up GitOps for the demo project. Whenever there is a new commit pushed to master branch, the CI job will be triggered to test, build, and redeploy the project. In case you want to revert to previous deployment, just run
git revert masterand push the change.
Multiple Deployment Environments
In our setup above, we deploy the demo project directly into the default namespace, which is not good. In real world, we may need to create multiple namespaces to cater deployment of multiple environments. Let’s create two namespaces, one for test, and one for production:
$ kubectl create namespace test$ kubectl create namespace production
We will also create corresponding branches in OneDev to track deployment in these environments. Before that, let’s edit our build spec to change last line of commands of build step as below:
if [ "@branch@" = "master" ]; then
    kubectl apply -f k8s.yaml -n production
else
    kubectl apply -f k8s.yaml -n @branch@
fi;
This tells OneDev to deploy our demo project into production namespace if build against master branch, and deploy into namespace identified by branch name otherwise. After committing the change, OneDev should be deploying the demo project into production namespace.
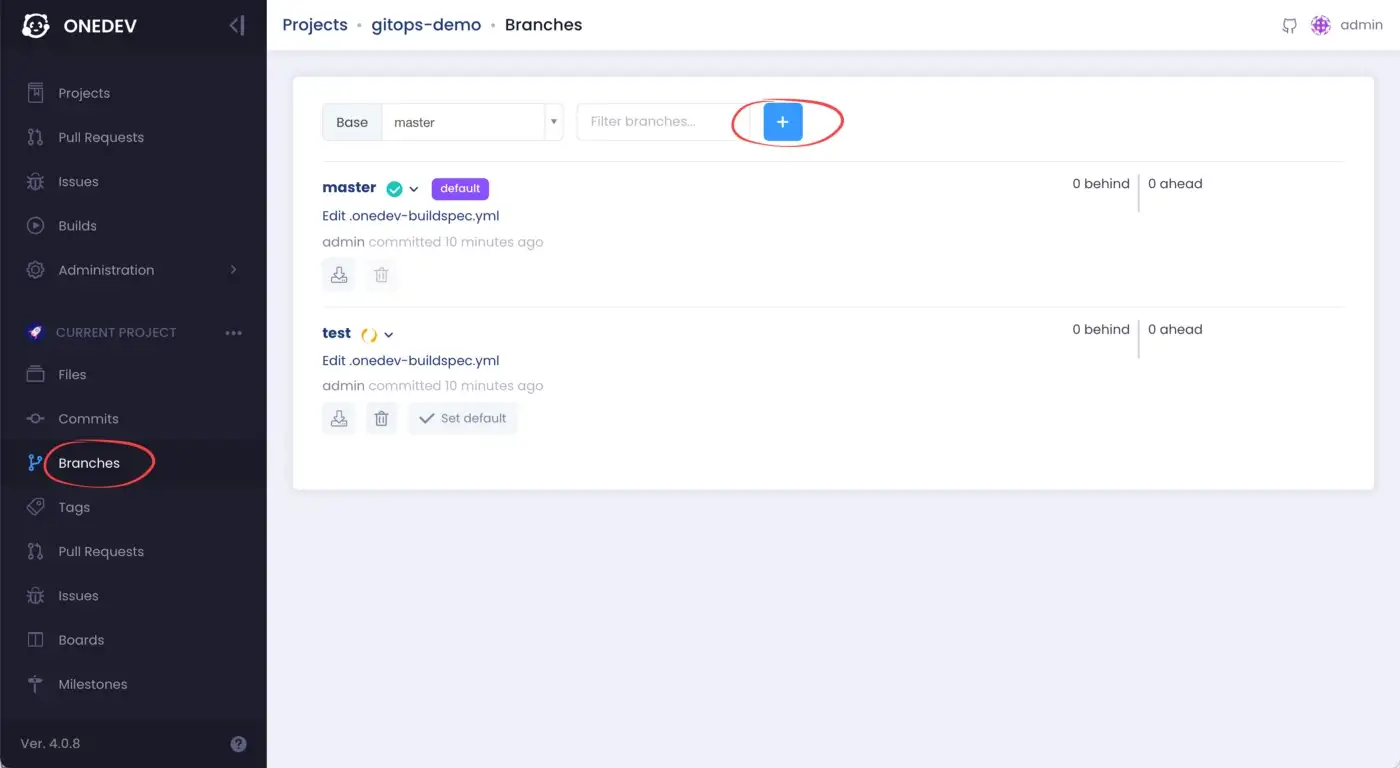
Now let’s create the test branch to track deployments for test environment. After creating the branch, OneDev will start to deploy the demo project into test namespace.
To get Kubernetes printing external ip address of deployed demo service in specified namespaces, run below command:
kubectl get service -n <namespace>
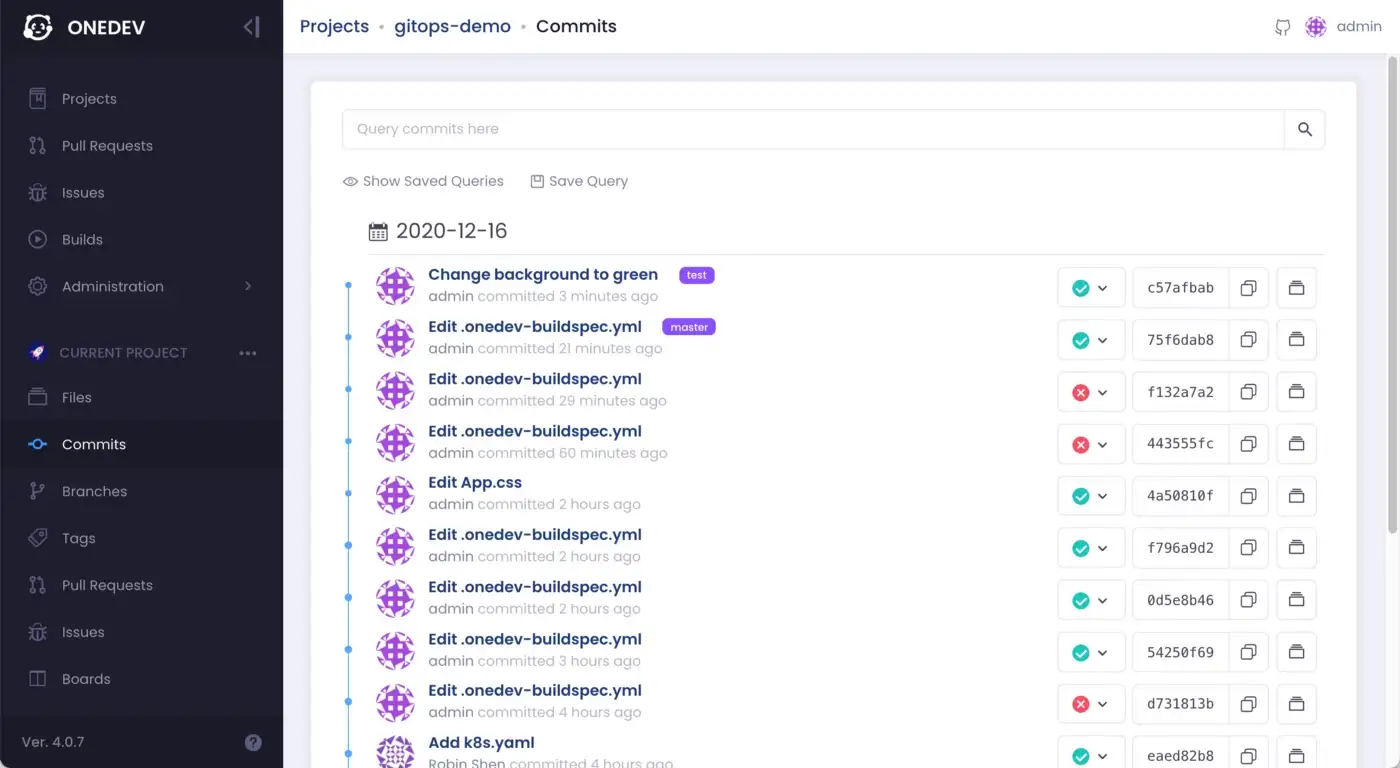
Now from the commits page, we have a clear view of deployment status in different environments, and we can control deployments in different environments by pushing/merging into corresponding branches.
Thanks for reading!