Working with Wiki
Wiki is available since OneDev 16.6.0.
OneDev stores wiki pages as Markdown files in your project repository. This lets you keep documentation alongside the code it describes: update both in the same commit or pull request, review changes together, and browse the documentation for a particular branch or release tag. You can edit pages in the browser or use your favorite editor and push changes with Git.
This tutorial builds a small wiki with a home page, a setup guide, images, and custom navigation. The examples use the default wiki folder.
Enable Wiki
- Open your project's Settings / General page.
- Enable Code Management and Wiki Management, then save the settings.
- Open Wiki in the project menu.
The Wiki menu entry opens the wiki; the Wiki Management switch on General Settings enables it:

To change where pages are stored, open Settings / Wiki and configure Wiki Folder:
- Leave it unset to inherit the parent project's setting. Without an inherited setting, OneDev uses
wiki. - Choose Specified Path to use a repository-relative folder such as
wikiordocs/wiki. - Choose Repository Root if the repository itself is dedicated to wiki content.
Click Update to save. Here, Specified Path selects the wiki folder:

Permissions
Anyone who can access the project can read its wiki; code read permission is not required. To edit wiki pages, users need code write permission on the project. Branch protection rules also apply.
For a wiki stored as a submodule, readers also need code read permission on the submodule project. Updating the wiki requires code write permission in both repositories: one to edit the wiki content, and the other to update the submodule pointer in the original project.
Create the Home Page
For a new wiki, OneDev displays Home page not found. Click the Add home page plus icon, keep Name as Home, and enter:
# Project Handbook

Welcome! Start with [[Guides/Getting Started|Getting started]].

## More Information

- [[Release Process]]
- [[Troubleshooting]]
Optionally enter a Commit message, then click Save page. This creates wiki/Home.md in the repository. Enter page names without the .md extension; OneDev adds it automatically and converts spaces in names to hyphens.
Use Edit page to update a page and Page history to inspect its previous changes. Each save creates a Git commit on the selected branch.
Add Pages and Placeholders
The home page above contains placeholders for pages you have not written yet. OneDev marks missing destinations and, when you can edit them, shows an Add this page plus icon beside each link.
Click the plus icon beside Getting started. OneDev fills in the page name. Enter the guide's content and click Save page. The home page link now opens the new page, and its missing marker disappears.
Use placeholders to plan your documentation and fill in pages later. To create a page directly, use the toolbar's Add page or upload files plus icon, then choose Add page.
Wiki links use double brackets, with an optional label after |:
[[Troubleshooting]]
[[Guides/Getting Started|Getting started]]
[[Guides/Getting Started#installation|Installation instructions]]
You can also use ordinary Markdown links, such as [Getting started](Guides/Getting-Started.md). To select an existing page while editing, use the editor's link button and choose Pick Existing. Selecting a wiki Markdown file inserts a wiki link for you.
Organize Pages into Subfolders
Include a folder in the page's Name, for example Guides/Getting Started. OneDev saves this as wiki/Guides/Getting-Started.md. You can organize a larger wiki like this:
wiki/
├── Home.md
├── _Sidebar.md
├── Guides/
│   ├── Getting-Started.md
│   └── Configuration.md
├── Release-Process.md
├── Troubleshooting.md
└── images/
    └── setup.png
Links are relative to the page containing them. From Guides/Getting-Started.md, use [[Configuration]] for a neighboring page and [[../Home|Home]] to return to the wiki home page. From Home.md, use [[Guides/Configuration|Configuration]].
To rename or move a page, edit its Name and save. Update links that point to its old location, and check relative links and image paths inside the moved page.
Upload and Reference Images
You can upload an image without leaving the page editor:
- Place the cursor where you want the image.
- Click the editor's image button and choose Upload.
- Select the image and its destination directory. The default is the current page's folder. For shared images in this example, use the repository-relative directory
wiki/images. - Click Commit & Insert to commit the image and insert its reference into the editor.
- Finish editing and click Save page to commit the page content.
The image upload is committed separately from the page, so canceling the page edit does not undo the upload.
To reuse an image already in the repository, click the image button and choose Pick Existing. OneDev inserts a relative path automatically. You can also write the reference yourself. In Home.md, use:

In Guides/Getting-Started.md, the same image needs a path relative to that subfolder:

To upload files outside the editor, use Add page or upload files / Upload files in the wiki toolbar, then reference them from your pages.
Customize Navigation
Expand Pages in the right-hand navigation to browse wiki pages, including those in subfolders. Use the toggle beside a page to expand its heading outline, then click a heading to jump directly to that section. By default, the navigation also displays the current page's heading outline.
For a curated navigation menu, click Customize at the bottom of the navigation. Use wiki links relative to _Sidebar.md at the wiki folder root, for example:
## Handbook

- [[Home]]
- [[Guides/Getting Started|Getting started]]
- [[Guides/Configuration|Configuration]]

## Maintaining the Project

- [[Release Process|Release process]]
- [[Troubleshooting]]
These links keep the selected branch or tag and work from both top-level and nested pages. Ordinary Markdown links such as [Home](Home.md) and image paths also resolve relative to the sidebar file.
Save the page to store the menu as _Sidebar.md at the wiki folder root. It appears across the wiki, replacing the default current-page outline; the expandable Pages navigation remains available.
Missing destinations in the sidebar display placeholders just like links in a page. Here the same sidebar links work while viewing Guides/Getting-Started:
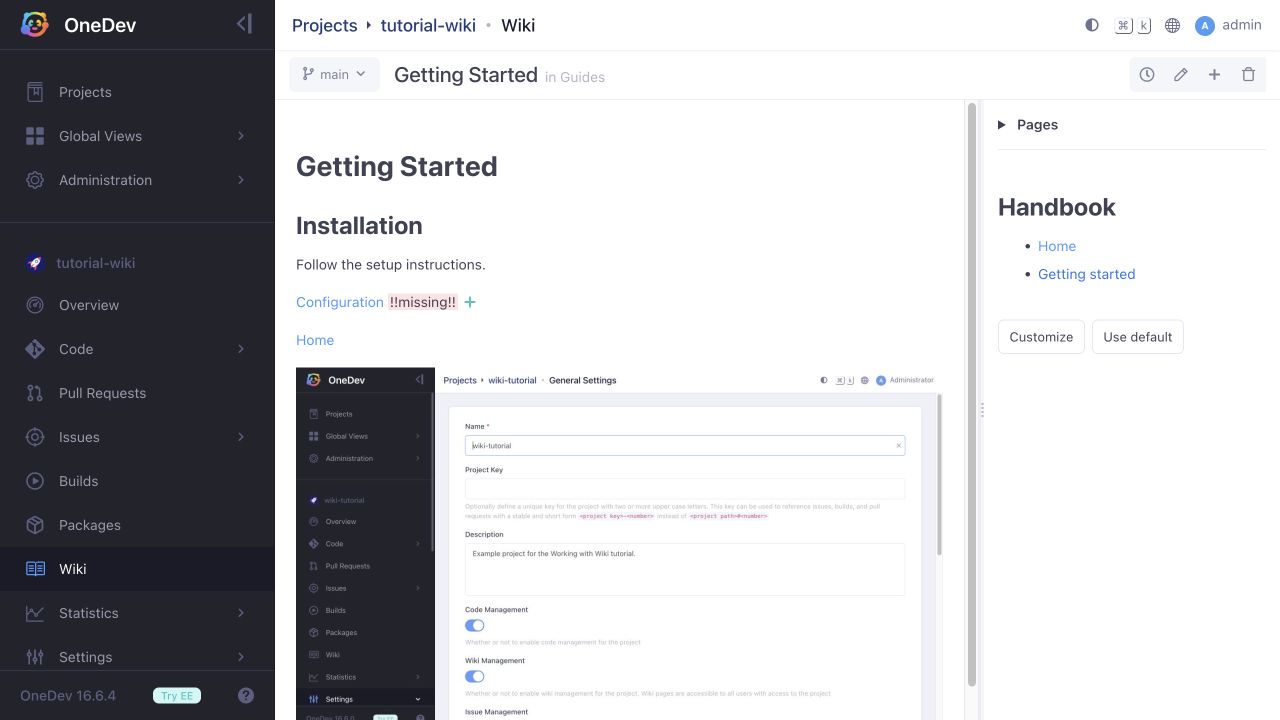
Click Customize again to edit the menu, or Use default to remove _Sidebar.md and restore the default outline.
Browse Wiki Versions
Use the branch/tag selector at the top of the wiki to switch versions. For example, main can document upcoming changes while a release branch describes the currently supported version. Selecting a release tag shows the wiki files as they existed for that release.
Select a branch when you want to edit: tags and commit revisions are read-only. Pages, images, and _Sidebar.md are all versioned together. You can propose wiki changes through a pull request using the normal code review workflow.
Keep Wiki Content in a Separate Repository
If you prefer to keep wiki content outside the project repository, use a Git submodule as the wiki folder:
-
Create another project on the same OneDev server for the wiki. Enable its wiki and set Wiki Folder to Repository Root. Add
Home.mdand other pages at its repository root. -
In a local checkout of your original project, add that repository as a submodule. Replace the example URL with the wiki project's HTTP(S) clone URL:
git submodule add https://onedev.example.com/team/project-wiki wikigit commit -m "Add wiki submodule"git push -
Set the original project's Wiki Folder to Specified Path with path
wiki. -
Open the original project's Wiki. It displays the pages from the submodule's recorded commit. The submodule permissions described above apply.
The embedded submodule wiki is read-only. Use the submodule icon in the wiki toolbar to open the target project's wiki, then select a branch to edit its pages there.
After updating the target wiki repository, update the submodule checkout to the desired commit and commit the new submodule pointer in the original project. Different branches and tags can pin different wiki commits, keeping release documentation reproducible.